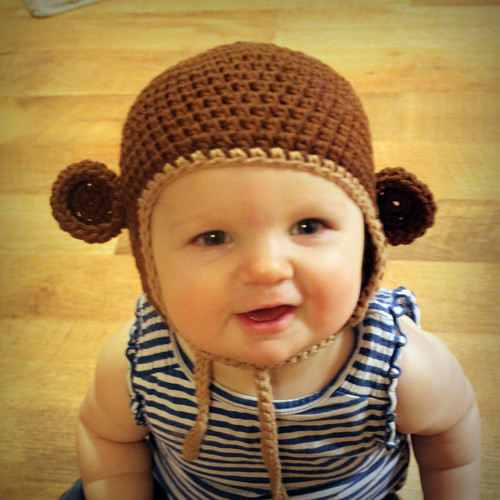
Make this adorable monkey hat in any size (newborn to adult)
Basic Needs for Pattern: Worsted weight Cotton and I hook
Here is the pattern (below) just in-case the free pdf download isn't working for you
Copyright Notice: You have permission to sell the finished products from this pattern but re-writing, re-selling, distributing, or copying this pattern itself is prohibited. If you decide to sell this hat please give Mamachee credit for the pattern with a link back to this pattern. Thank you for your understanding and cooperation
Don't forget to share pictures on my facebook, I love to see your finished projects!
*Worsted Weight Cotton
in two colors: MC and CC
*I hook
*Yarn Needle
*Scissors
Gauge: 7 hdc’s and 5 rows = 2” square
Notes: Do not count your turning chains as a stitch throughout pattern, always join in
first stitch of row and always start your first stitch in the same stitch your joined into. Do
not turn your work unless told to do so.
0-3 mo.
With MC Ch 2
Rnd 1 – Work 8hdc in 2nd ch from hook, join. (8)
Rnd 2 – Ch 2, Work 2hdc into each st around, join. (16)
Rnd 3 – Ch 2, (hdc in next, 2hdc in next) around, join (24)
Rnd 4 – Ch 2, (hdc in next 2, 2hdc in next) around, join. (32)
Rnd 5 – Ch 2, (hdc in next 3, 2hdc in next) around, join. (40)
Rnd 6 – Ch 2, (hdc in next 9, 2hdc in next) around, join. (44)
Rnd 7 through Rnd 13 – Ch 2, hdc in each st around, join. (44)
Start on first earflap
Earflap:
Row 1 – Ch 2, hdc in next 10
Row 2 – Ch 2 and turn, hdc2tog, hdc in next 6, hdc2tog. (8)
Row 3 – Ch 2 and turn, hdc2tog, hdc in next 4, hdc2tog. (6)
Row 4 – Ch 2 and turn, hdc2tog, hdc in next 2, hdc2tog. (4)
Row 5 – Ch 2 and turn, hdc2tog twice. (2)
Fasten off and repeat earflap instructions for second earflap. The space across forehead
should be 18 st’s wide.
Fasten off and weave in ends
With CC
Join in the back of hat and work sc’s evenly around the whole hat. When you reach the
top 2 st’s from the last row of your earflap follow these instructions:
*Work 3sc’s into the first st of Row 5, Ch 36, sl st into 2nd ch and in remaining 34 Ch’s,
Work 3sc in last stitch of Row 5 of the earflap, continue with sc’s around hat* until your
reach the top of next earflap, repeat from * to * one more time.
Fasten off and weave in ends. See below for ear pattern.
3-6 mo.
With MC Ch 2
Rnd 1 – Work 8hdc in 2nd ch from hook, join. (8)
Rnd 2 – Ch 2, Work 2hdc into each st around, join. (16)
Rnd 3 – Ch 2, (hdc in next, 2hdc in next) around, join (24)
Rnd 4 – Ch 2, (hdc in next 2, 2hdc in next) around, join. (32)
Rnd 5 – Ch 2, (hdc in next 3, 2hdc in next) around, join. (40)
Rnd 6 – Ch 2, (hdc in next 4, 2hdc in next) around, join. (48)
Rnd 7 through Rnd 14 – Ch 2, hdc in each st around, join. (48)
Start on first earflap
Earflap:
Row 1 – Ch 2, hdc in next 12
Row 2 – Ch 2 and turn, hdc2tog, hdc in next 8, hdc2tog. (10)
Row 3 – Ch 2 and turn, hdc2tog, hdc in next 6, hdc2tog. (8)
Row 4 – Ch 2 and turn, hdc2tog, hdc in next 4, hdc2tog. (6)
Row 5 – Ch 2 and turn, hdc2tog, hdc in next 2, hdc2tog. (4)
Row 6 – Ch 2 and turn, hdc2tog twice. (2)
Fasten off and repeat earflap instructions for second earflap. The space across forehead
should be 19 st’s wide.
Fasten off and weave in ends
With CC
Join in the back of hat and work sc’s evenly around the whole hat. When you reach the
top 2 st’s from the last row of your earflap follow these instructions:
*Work 3sc’s into the first st of Row 6, ch 41, sl st into 2nd ch and in remaining 39 ch’s,
Work 3sc in last stitch of Row 6 of the earflap, continue with sc’s around hat* until your
reach the top of next earflap, repeat from * to * one more time.
Fasten off and weave in ends. See below for ear pattern.
6-12 mo.
With MC Ch 2
Rnd 1 – Work 8hdc in 2nd ch from hook, join. (8)
Rnd 2 – Ch 2, Work 2hdc into each st around, join. (16)
Rnd 3 – Ch 2, (hdc in next, 2hdc in next) around, join (24)
Rnd 4 – Ch 2, (hdc in next 2, 2hdc in next) around, join. (32)
Rnd 5 – Ch 2, (hdc in next 3, 2hdc in next) around, join. (40)
Rnd 6 – Ch 2, (hdc in next 4, 2hdc in next) around, join. (48)
Rnd 7 – Ch 2, (hdc in next 11, 2hdc in next) around, join (52)
Rnd 8 through Rnd 15 – Ch 2, hdc in each st around, join. (52)
Start on first earflap
Earflap:
Row 1 – Ch 2, hdc in next 14
Row 2 – Ch 2 and turn, hdc2tog, hdc in next 10, hdc2tog. (12)
Row 3 – Ch 2 and turn, hdc2tog, hdc in next 8, hdc2tog. (10)
Row 4 – Ch 2 and turn, hdc2tog, hdc in next 6, hdc2tog. (8)
Row 5 – Ch 2 and turn, hdc2tog, hdc in next 4, hdc2tog. (6)
Row 6 – Ch 2 and turn, hdc2tog, hdc in next 2, hdc2tog. (4)
Row 7 – Ch 2 and turn, hdc2tog twice. (2)
Fasten off and repeat earflap instructions for second earflap. The space across forehead
should be 20 st’s wide.
Fasten off and weave in ends
With CC
Join in the back of hat and work sc’s evenly around the whole hat. When you reach the
top 2 st’s from the last row of your earflap follow these instructions:
*Work 3sc’s into the first st of Row 7, ch 41, sl st into 2nd ch and in remaining 39 ch’s,
Work 3sc in last stitch of Row 7 of the earflap, continue with sc’s around hat* until your
reach the top of next earflap, repeat from * to * one more time.
Fasten off and weave in ends. See below for ear pattern.
Toddler
With MC Ch 2
Rnd 1 – Work 8hdc in 2nd ch from hook, join. (8)
Rnd 2 – Ch 2, Work 2hdc into each st around, join. (16)
Rnd 3 – Ch 2, (hdc in next, 2hdc in next) around, join (24)
Rnd 4 – Ch 2, (hdc in next 2, 2hdc in next) around, join. (32)
Rnd 5 – Ch 2, (hdc in next 3, 2hdc in next) around, join. (40)
Rnd 6 – Ch 2, (hdc in next 4, 2hdc in next) around, join. (48)
Rnd 7 – Ch 2, (hdc in next 5, 2hdc in next) around, join (56)
Rnd 8 through Rnd 16 – Ch 2, hdc in each st around, join. (56)
Start on first earflap
Earflap:
Row 1 – Ch 2, hdc in next 14
Row 2 – Ch 2 and turn, hdc2tog, hdc in next 10, hdc2tog. (12)
Row 3 – Ch 2 and turn, hdc2tog, hdc in next 8, hdc2tog. (10)
Row 4 – Ch 2 and turn, hdc2tog, hdc in next 6, hdc2tog. (8)
Row 5 – Ch 2 and turn, hdc2tog, hdc in next 4, hdc2tog. (6)
Row 6 – Ch 2 and turn, hdc2tog, hdc in next 2, hdc2tog. (4)
Row 7 – Ch 2 and turn, hdc2tog twice. (2)
Fasten off and repeat earflap instructions for second earflap. The space across forehead
should be 21 st’s wide.
Fasten off and weave in ends
With CC
Join in the back of hat and work sc’s evenly around the whole hat. When you reach the
top 2 st’s from the last row of your earflap follow these instructions:
*Work 3sc’s into the first st of Row 7, ch 41, sl st into 2nd ch and in remaining 39 ch’s,
Work 3sc in last stitch of Row 7 of the earflap, continue with sc’s around hat* until your
reach the top of next earflap, repeat from * to * one more time.
Fasten off and weave in ends. See below for ear pattern.
Child
With MC Ch 2
Rnd 1 – Work 8hdc in 2nd ch from hook, join. (8)
Rnd 2 – Ch 2, Work 2hdc into each st around, join. (16)
Rnd 3 – Ch 2, (hdc in next, 2hdc in next) around, join (24)
Rnd 4 – Ch 2, (hdc in next 2, 2hdc in next) around, join. (32)
Rnd 5 – Ch 2, (hdc in next 3, 2hdc in next) around, join. (40)
Rnd 6 – Ch 2, (hdc in next 4, 2hdc in next) around, join. (48)
Rnd 7 – Ch 2, (hdc in next 5, 2hdc in next) around, join (56)
Rnd 8 – Ch 2, (hdc in next 13, 2hdc in next) around, join (60)
Rnd 9 through Rnd 18 – Ch 2, hdc in each st around, join. (60)
Start on first earflap
Earflap:
Row 1 – Ch 2, hdc in next 14
Row 2– Ch 2 and turn, hdc2tog, hdc in next 10, hdc2tog. (12)
Row 3– Ch 2 and turn, hdc2tog, hdc in next 8, hdc2tog. (10)
Row 4– Ch 2 and turn, hdc2tog, hdc in next 6, hdc2tog. (8)
Row 5– Ch 2 and turn, hdc2tog, hdc in next 4, hdc2tog. (6)
Row 6– Ch 2 and turn, hdc2tog, hdc in next 2, hdc2tog. (4)
Row 7– Ch 2 and turn, hdc2tog twice. (2)
Fasten off and repeat earflap instructions for second earflap. The space across forehead
should be 24 st’s wide.
Fasten off and weave in ends
With CC
Join in the back of hat and work sc’s evenly around the whole hat. When you reach the
top 2 st’s from the last row of your earflap follow these instructions:
*Work 3sc’s into the first st of Row 7, ch 41, sl st into 2nd ch and in remaining 39 ch’s,
Work 3sc in last stitch of Row 7 of the earflap, continue with sc’s around hat* until your
reach the top of next earflap, repeat from * to * one more time.
Fasten off and weave in ends. See below for ear pattern.
Teen/Adult
With MC Ch 2
Rnd 1 – Work 8hdc in 2nd ch from hook, join. (8)
Rnd 2 – Ch 2, Work 2hdc into each st around, join. (16)
Rnd 3 – Ch 2, (hdc in next, 2hdc in next) around, join (24)
Rnd 4 – Ch 2, (hdc in next 2, 2hdc in next) around, join. (32)
Rnd 5 – Ch 2, (hdc in next 3, 2hdc in next) around, join. (40)
Rnd 6 – Ch 2, (hdc in next 4, 2hdc in next) around, join. (48)
Rnd 7 – Ch 2, (hdc in next 5, 2hdc in next) around, join (56)
Rnd 8 – Ch 2, (hdc in next 6, 2hdc in next) around, join (64)
Rnd 9 through Rnd 20 – Ch 2, hdc in each st around, join. (64)
Start on first earflap
Earflap:
Row 1 – Ch 2, hdc in next 16
Row 2 – Ch 2, and turn, hdc2tog, hdc in next 12, hdc2tog. (14)
Row 3 – Ch 2 and turn, hdc2tog, hdc in next 10, hdc2tog. (12)
Row 4 – Ch 2 and turn, hdc2tog, hdc in next 8, hdc2tog. (10)
Row 5 – Ch 2 and turn, hdc2tog, hdc in next 6, hdc2tog. (8)
Row 6 – Ch 2 and turn, hdc2tog, hdc in next 4, hdc2tog. (6)
Row 7 – Ch 2 and turn, hdc2tog, hdc in next 2, hdc2tog. (4)
Row 8 – Ch 2 and turn, hdc2tog twice. (2)
Fasten off and repeat earflap instructions for second earflap. The space across forehead
should be 25 st’s wide.
Fasten off and weave in ends
With CC
Join in the back of hat and work sc’s evenly around the whole hat. When you reach the
top 2 st’s from the last row of your earflap follow these instructions:
*Work 3sc’s into the first st of Row 8, ch 41, sl st into 2nd ch and in remaining 39 ch’s,
Work 3sc in last stitch of Row 8 of the earflap, continue with sc’s around hat* until your
reach the top of next earflap, repeat from * to * one more time.
Fasten off and weave in ends. See below for ear pattern.
EARS for: 0-3 mo, 3-6 mo. 6-12 mo, and Toddler
With MC Ch 2
Rnd 1 – Work 8hdc’s into 2nd ch from hk, join. (8)
Rnd 2 – Ch 2, work 2dc’s in each st around. join. (16)
Rnd 3 – Ch1, sc in each st around. join. (16)
Fasten off and leave a tail long enough to sew ear to hat.
Sew ear to hat and weave in all ends.
See photo’s for help with placement of ears.
EARS for: Child and Adult
With MC Ch 3
Rnd 1 – Work 12dc’s into 3rd ch from hk, join. (12)
Rnd 2 – Ch 2, (dc in next, 2dc in next) around, join. (18)
Rnd 3 – Ch 1, sc in each st around, join. (18)
Fasten off and leave a tail long enough to sew ear to hat.
Sew ear to hat and weave in all ends.
See photo’s for help with placement of ears.
Original pattern taken from http://easymakesmehappy.blogspot.com/2010/12/free-crochet-pattern-monkey-hat.html